Start streaming your pre-recoded videos to Facebook Live using OBS Studio, a FREE and open source software for video recording and live streaming.
1. First, you need to download and install OBS Studio app on your computer.
2. On the Sources section, click the + icon, then Media Source and Create New. Type the name of your media then click OK. On a popup window, click the Browse button to find your pre-recorded video then check the Loop and click OK. The video will automatically play on your OBS Studio preview.
3. Now, on the upper right of the OBS Studio window, click File > Setting. Click Stream on the popup window to the Stream Key section.
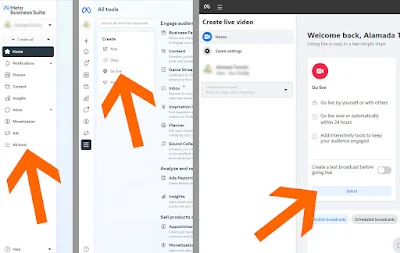
4. Go to Meta Business Suite of your Facebook Page then click the All Tools on the lowest part of the left menu. Click the Go Live and the Select button Go Live column. Click the Streaming Software as a video source to find the Stream Key.
5. Copy the Stream Key then go back to OBS Studio, paste Stream Key and click OK, and then click the Start Streaming button.
6. When the OBS Studio and Facebook Live is successfully connected, the preview of your video shall appear simultaneously on your Meta Stream Setup. Make sure to add the Title and Description of your video by clicking "What's your live video about?" box.
7. Click the Go Live button when it turns to blue after completing the setup.
Congratulations! You are done. Check on your Facebook page if your live video is streaming well. Take note that the speed of your internet connection affects the quality of your live video.


No comments:
Post a Comment